

How To Use Downloaded Font On Cricut
This post may incorporate affiliate links for your convenience. If yous make a purchase through one of my links I will earn a minor commission at no additional toll to you lot.
Are you ready to make your own text designs in Cricut Design Infinite? At that place are so many fun things nosotros can exercise from calculation our own font to curving text and making monograms. This tutorial has it all covered.
Once you take these text editing basics downwardly you can brand many things similar a automobile decal, a beautiful manus painted sign, or stick your vinyl straight to a canvas, mugs, shirts, and many more. The possibilities are endless!
So let'due south get started.
PIN Information technology

Quick Links to Information in This Post
Getting Started with Text

To get started with text only click the text icon on the left toolbar. Your text box will appear and you can brainstorm typing.
On the top toolbar you can choose your font, the way, and the size. You lot tin can also adjust your letter spacing and line spacing. I will be covering all of these in this tutorial.
It'south usually easier to type out your text first and then make the changes y'all want.
Fonts

When you click on fonts another box appears showing you all available fonts. Yous can also choose to run into just your fonts past clicking on arrangement or see but Cricuts fonts past clicking on Cricut. In that location is a search selection if you know the name of the font you want. And yous can also filter the fonts if you are looking for a writing or multilayer font.
How to Add Your Own Fonts
I find most of my fonts on CreativeMarket.com, TheHungryJpeg.com or DaFont.com.
A annotation on fonts….if y'all are going to sell your creations, make sure the font comes with a commercial license.
After yous download a font you lot want to use, detect the file on your computer (it ordinarily goes to downloads) and open it. Fonts come up in a cipher file so the first affair you will need to do is click extract files if information technology doesn't happen automatically.

Once the files are extracted yous will see all of the variations of the font in the binder. This one came with the original plus italics and assuming. I don't find it necessary to install all of the variations, the original tin be changed in your pattern software.
There are likewise two versions that you could meet, one is called Open Blazon Font and the other is True Type Font. I ever install the Open Blazon. Not all systems will let you install Open Type and not all Systems will allow yous install true type. And so if one is not working try the other.
Now that we've found the file nosotros desire, simply right click on information technology and so click install. Your new font will now show up under organization fonts in design infinite. NOTE: If y'all have design space open when you install a new font yous will accept to close information technology and re-open it to see your new font.
How To Admission Special Characters
Ane of the most fun things virtually script fonts is all of the swooshes and swashes and tails you can add to the messages. Some fonts include these in their font file.
A favorite of mine is chosen Humble Script. It comes with a lot of cool extras.
When using design space you tin can find the special characters by using the Graphic symbol Map (Windows) or Font Book (Mac).

Commencement to type 'graphic symbol map' in your system search box and the app will come up upward. Click on it to open it.
 There is a top driblet-downwards menu that allows you to select the font you are working with. On the bottom brand sure 'Advanced View' is checked. Change the Character set to Unicode and group past Unicode Subrange. A new box volition appear for the Unicode Subrange. Scroll all the way to the bottom and select 'Private Use Characters'.
Now you will be able to meet all the goodness.
Hover over or click on the special letters and find i you want to use. Then click select and then click copy.

Back in design infinite…. In your text box delete the alphabetic character you desire to replace. And so hit control plus the '5' key at the same time to paste your new special graphic symbol. In the text box it will look like but a foursquare, but the bodily text will alter.
Become ahead and play effectually changing every bit many letters as y'all desire. The globe can't have enough swooshes and swashes subsequently all =)
Fixing or Joining Together Script
I'm sure you've noticed script fonts are spaced really weird in pattern infinite. There are two ways to prepare this.

The get-go way is my least favorite. You can reduce the alphabetic character infinite on the peak toolbar. The lower you make the number go, the closer together your letters volition go.
Just sometimes it squishes the letters downwards too and you lose the centers of "A's" and "e's". And information technology doesn't e'er squish them together evenly. So where one give-and-take may look skillful, the next one even so has gaps.

I think the all-time style is to highlight all of your letters so they are selected and so hit the ungroup button on your tiptop right toolbar.

This allows you to select and move each letter individually. Only click on the letter of the alphabet and move it over and so it's fastened to the side by side letter of the alphabet. This may be a bit irksome if you have a lot of script, merely it will look and so much better.
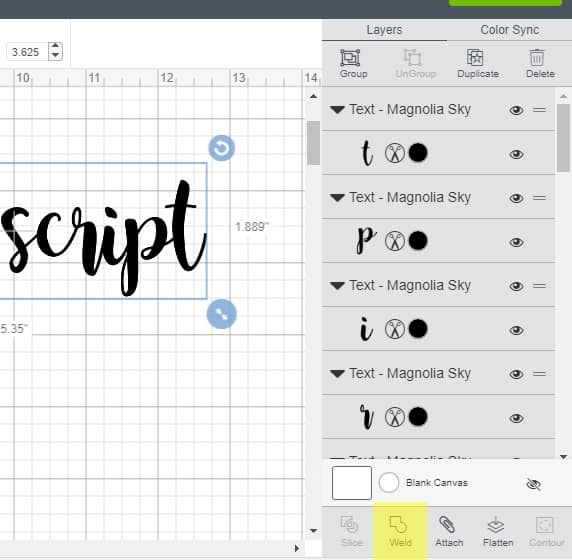
When your letters are bundled it is SUPER Important that you lot highlight all of the script and then it is selected so hitting the weld push button on the bottom right toolbar.
Welding your script means it will all be cutting as one continuous word. Otherwise, each individual letter will be cutting even though it looks like they are together.
Resize and Middle Lines of Text in Design Space

When you open your text box, you lot can type the words you want on the first line and then hit enter and beginning typing your second line. Then you tin reduce the spacing between your lines by clicking the line spacing push on your top toolbar and decreasing the number.
I prefer each line of my text to have a dissever box. So I type the first line and so I hit the text button again to get another box and type the second line. This gives y'all more than control on spacing and sizing. Simply click on your lines and elevate them where you desire them to become.
To change the size you tin can use the font size on the height toolbar. But I discover it's faster to use the arrows at the lesser of your text. Click and drag out for bigger and drag in for smaller.

After y'all're happy with the sizing and spacing of your text lines, highlight and select all of them together. Next click the align button on the top toolbar. Y'all can then choose to align your text lines all to the left, center them, or align all to the correct.
I usually center all of my text.
How To Curve Text
At present that y'all are getting some of the basics down, we tin motility on to some fun stuff like curving text. This is actually quite easy to practice in design space.

Start blazon out your text and choose your font. Next, on the top toolbar select the curve function. If y'all slide the adjuster to the right your text will curve down.

And if you slide it to the left your text will curve up.

After you are washed curving use your alphabetic character spacing option if you need to make adjustments. And you lot can select everything and centre your lines.
How To Make A Stencil
Stencils are dandy for mitt painted signs, 1 of my favorite crafts to do. To make a stencil in pattern space offset with the shapes tool on the left toolbar.

Yous can click on the unlock button on the lesser left to stretch your shape into a rectangle. I likewise changed the color of my box to blue so it's easier to run across when we overlay the text. Yous can alter it to anycolor.
Next, utilise your text tool to create the saying you lot desire on your stencil.
Refer back to the previous tips if you need assist with centering, spacing, sizing, curving, or fonts.
Later you are happy with your text highlight and select all of the text and click the attach button on the bottom correct toolbar. This will keep everything together so nosotros can move it.
Move your text on top of the box you created.

Select both the text and the box and then select the align tool on the top toolbar. Select Align Horizontally and then select Align Vertically. This will center your text within the box.
While both your text and box are still selected click the attach button on the bottom correct toolbar.

Your words should alter to the same color every bit your box with the cutting line still visible. Now everything is stuck together and yous are fix to get in.
I take a whole detailed post dedicated to Making a Stencil in Cricut Design Space if you want more details and tips.

Making a Monogram in Cricut Design Space
Monogram crafts and gifts are e'er super popular, then this tutorial wouldn't be complete without learning how to make one.
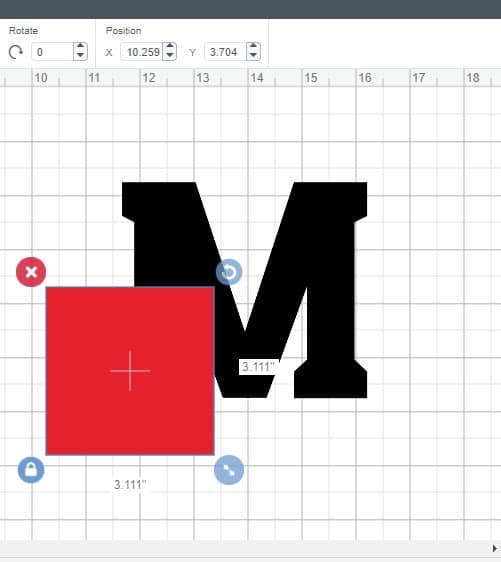
Kickoff with the letter you desire to turn into a monogram and size it pretty big and then information technology's easy to work with. Yous can adjust the size back down if needed when you are done.
Next make a square and unlock it to stretch it into a rectangle. Once again I changed the colour of the square just and so it's easier to run into, colour doesn't affair.

Make the rectangle slightly longer than your letter, with a width that looks good in relation to your large letter. Go along in mind yous will demand more text to fit inside the width you make the rectangle.
Once you lot accept everything lined up and sized how you like, select everything. Then click the Slice button on the bottom right toolbar.

Slicing will cut out the surface area the rectangle was covering. You actually get about three layers y'all tin can movement out and delete. (but select and hit the delete key on your keyboard)
Now we have space in our main letter to add together more text.
Adding Lines to Your Monogram

If you want to add the extending lines to your monogram make another foursquare shape. Unlock it so you tin arrive longer than your letter and super thin. Once information technology'southward sized correctly right-click the shape and select duplicate.
This will give you an verbal duplicate that you tin can employ for the bottom.

Once both of your shapes are in identify select everything. Then select your align tool on the pinnacle toolbar and align everything horizontally. While everything is still selected, striking the attach button on the bottom correct toolbar to keep everything together.

Now y'all can make your text for the center. After it is done be sure to align middle and and so adhere again. Your monogram is ready to cutting!
BONUS TIP
Do you desire to learn How To Make Knockout Designs also? See my mail service here.
I'one thousand certain yous have or will at some point striking the make information technology push and your pretty design in Design Infinite volition look like a jumbled mess on the cut mat preview.
This is because you have to attach everything together to let Cricut know yous want it to cut together. And then don't forget to select everything and click attach (lesser correct toolbar) earlier you hit get in!
And don't forget to select all of your words written in script and click the weld button. This is and then information technology gets cut as one continuous word instead of private messages.
Wow you've learned a lot! Just imagine all of the gorgeous things yous can create now. Exist sure to pin this commodity so you tin can refer back to it every bit often as needed.
Would yous like to learn more Cricut Tips? Or even get FREE SVG cut files? Exist sure to join my weekly newsletter for both! Subscribers get access to my Free resources library where I keep all of my free SVG cut files.
PIN IT


Chris Butler has helped thousands of crafters learn how to use their Cricut machine without feeling overwhelmed. She is a best selling author and an up and coming designer. For fun Chris enjoys designing SVG Files, hanging out with her family unit (preferably at the lake), traveling, and volunteering at her church. She is a wife and mom of two crazy fun kids.

Source: https://dailydoseofdiy.com/how-to-edit-text-cricut-design-space/
Posted by: wilcoxsationg.blogspot.com
0 Response to "How To Use Downloaded Font On Cricut"
Post a Comment